You won't look back once you've discovered these simple tricks!

The Procreate symmetry function is a powerful and often overlooked tool which you can use to great effect in creating unique surface patterns.
Here are three simple ways to use the symmetry tool in your pattern making. (They can also be used to create stand alone illustrations too if repeat patterns aren’t your thing!)
How do I use the Procreate symmetry tool?
If you’re new to Procreate and haven’t had a go with the symmetry tool yet, you can find it by clicking on the actions button at the top left (the icon for this is a spanner)
Select canvas and toggle drawing guide to on.
Click edit drawing guide and select symmetry on the bottom panel.


You can see now that if you click options under this you have the option for vertical, horizontal, quadrant and radial symmetry.
Bear in mind that when drawing assist is on, for each new layer you create you will have to enable drawing assist in the layers panel. You do this by tapping the layer and selecting drawing assist. Whatever settings you selected in the symmetry panel will now be applied to this layer.
1. Create a simple blender pattern using radial symmetry.
The possibilities are endless for this one and you can come up with some beautiful patterns very quickly and easily.

I think this is a great way to create a simple coordinate or blender print to add to a pattern collection.
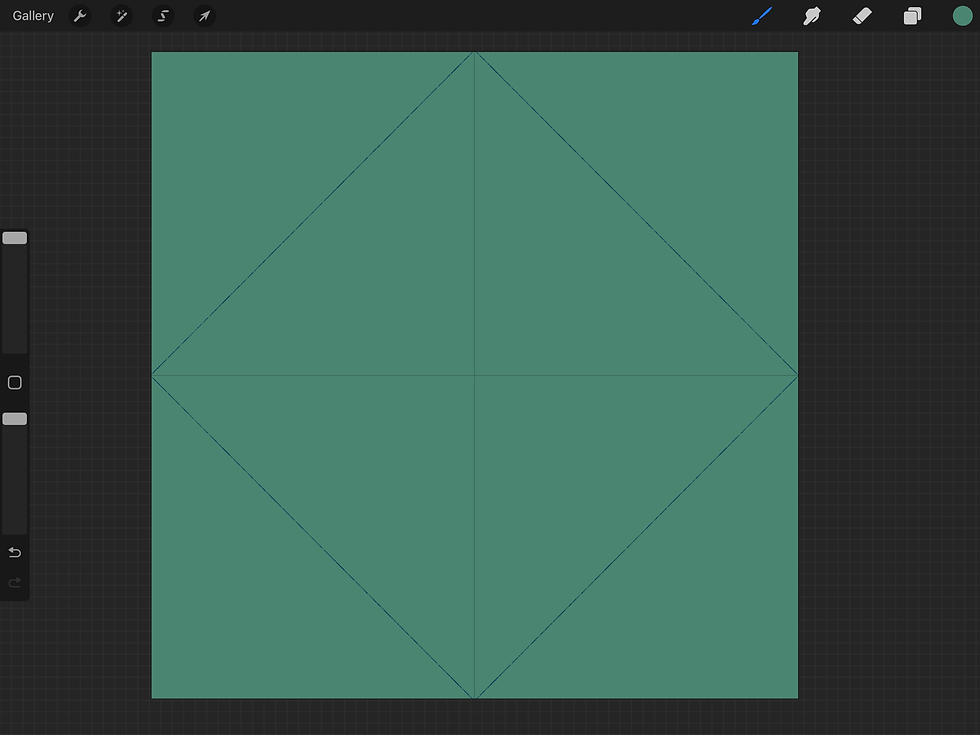
Start with a blank canvas (I like to use a 12x12 inch canvas at 300dpi) and turn on quadrant symmetry.
Create a diamond shape by drawing a line in pencil from one middle point of the side to another. This will be deleted later but for now it gives you a framework to design in.
Create a new layer below your template and fill it with a solid background colour.
Now add a new layer above your template. This is going to be for the pattern so you need to select a brush and a colour that will contrast or complement your background colour nicely. (Don’t worry though the colours can be changed very easily at any point!)
On this layer turn on drawing assist and then go back to the symmetry tool and turn on radial symmetry. (If you’re wondering how to do all this go back up and read the How do I use the symmetry tool section!)
Now for the fun part!
Start creating some lines, flowers, squiggles or anything else you like within the diamond shape and you should see your masterpiece coming together!
It’s helpful to create within the diamond shape but you don’t need to go all the way to the edges, just to the corners as you can see in the example below.

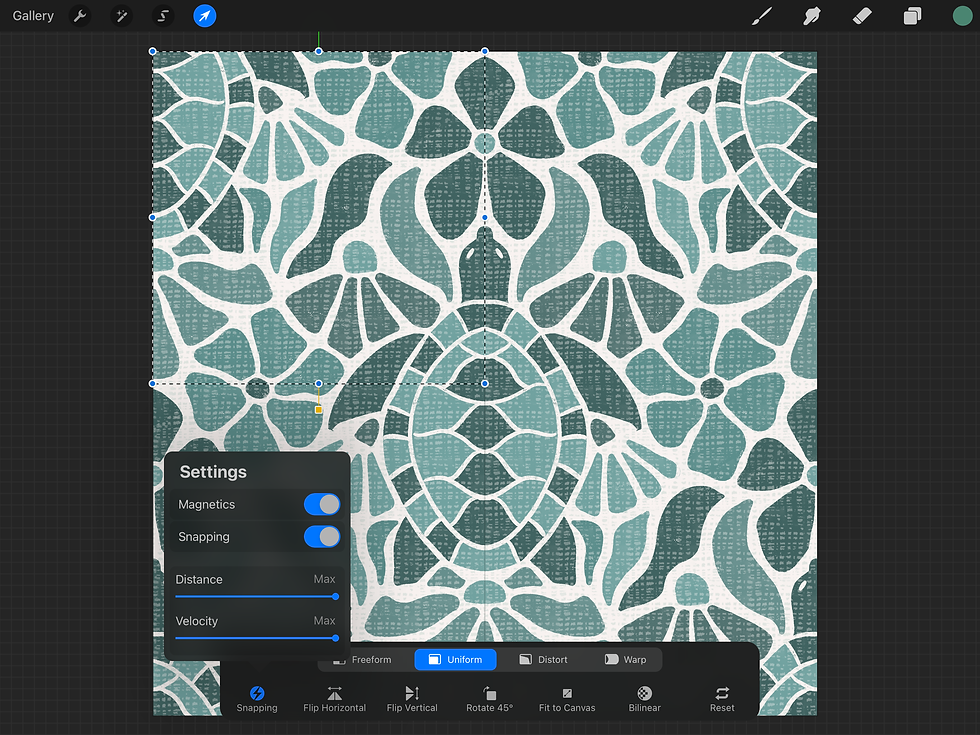
Then on this layer make a small mark in the top left and bottom right corner (so the whole canvas is selected, this will be deleted later) and duplicate the layer four times so you have 5 identical layers.

With snapping and magnetics turned on, drag four of them to each of the four corners ensuring they snap in the middle (you’ll know because the lines will turn orange) Leave the original one in the middle and you should finish with something like this:

Carefully rub out the marks you made in the corners (on the original layer they will be at the corners and on the layers you dragged the marks will now be in the middle)
Delete or hide the diamond template and merge the pattern layers together (leave the background colour as its own separate layer!). You can now finish filling in the space left with more of the same!
I think these types of patterns make great blender prints when you need a pattern with only a couple of colours to complement a more colourful design.

2. Make yourself a layout template and use vertical symmetry to fill it.
If you’re unsure how to create a layout template, check out this post which gives some in-depth instructions, but if you’re keen to get going you can just use a simple diamond template as we did above.
Once you have made your template, create a new layer which will be your sketch layer and switch to vertical symmetry.
Now whatever you draw on one side will be mirrored exactly on the other side.
Again there are so many possibilities for this kind of pattern!
You could keep it simple and draw something floral.

You could choose a symmetrical animal and design around this focal point.

When you have filled your template, create marks in the top left and bottom right so that the whole canvas is selected and duplicate the layer four more times so you have five identical layers.
With snapping and magnetics turned on, drag four of them to each of the four corners ensuring they snap in the middle (you’ll know because the lines will turn orange) Leave the original one in the middle.
Carefully rub out the marks you made in the corners and you will be left with your repeat tile!
If you'd like a step by step tutorial on how to create a symmetrical pattern like this using a template (including how to add textures!) check out my Procreate Patterns Class!
3. Use the symmetry tool to create individual elements that fit into your pattern.
Although the ice cream pattern below is not symmetrical, I used the symmetry tool throughout to create symmetrical ice cream motifs.

One thing I discovered while creating this pattern is that you can move the line of symmetry in Procreate. (It doesn't just have to be in the middle!)
For example, below is my sketch layer for this pattern.
When I came to the final drawing stage, I was able to move the symmetry line to each ice cream so I could create them symmetrically. (Not all of them are symmetrical, but parts of them are, such as the cones, so I'd use drawing assist for those parts, then turn it off to draw the non symmetrical parts.)

To move the line go to edit drawing guide under the spanner icon and click symmetry. You can see that when the symmetry line comes up it has a blue and a green dot on it. To move it in its current orientation use the blue dot to position it where you want it.
To change the orientatrion of the line, click the green dot and drag it to where you want it.
If you want to reset the line, just click on the blue or green dot and hit reset.
Conclusion
So there you have it, three fun ways to use the symmetry tool to create great patterns. What I love most about the symmetry tool is it feels like you only need to do half the work!
Tell me in the comments below if this has been helpful and which one you’re going to try first! If you have any questions or need some clarification, don’t hesitate to ask!
This is so helpful! Thank you for sharing!
Thanks you so much for these clear instructions!! I can’t wait to get to my iPad and try it!
oooh, can't wait to try all 3 of these techniques! Thank you for sharing!